
When working with custom blocks or custom solutions to enhance the WordPress Block Editor, you might need to have a way to add blocks programmatically to the editor.
In this article we’ll cover:
- how to add a block through code to the editor
- how to find the index (position) of a particular block
- how to find the position after the selected block
The code here will be a simple one because we’ll not use React or anything that would require building the code.
We’ll just use regular JavaScript that can be used right in the web console.
This code will add the new paragraph block at the end of the block editor.
What Happens in this Code?
First, we use the function createBlock which will create an object that can be further used to add it to the editor.
We need to pass the block name and the attributes that such a block accepts.
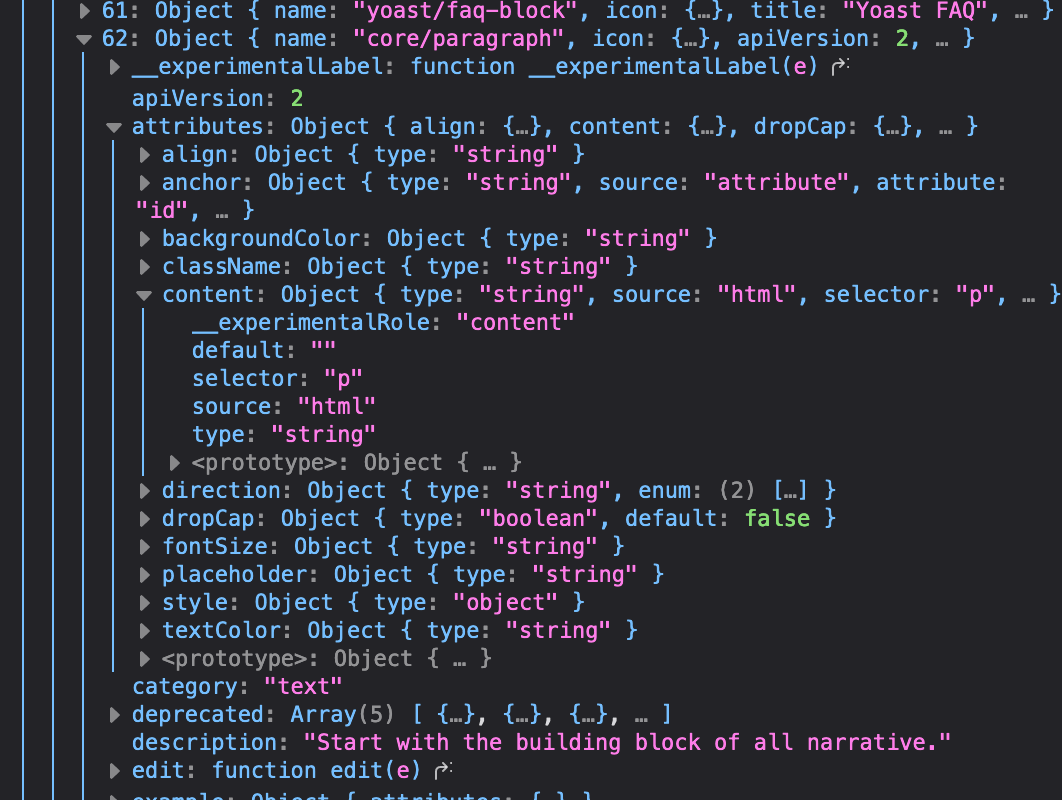
How to know which attributes a block accepts?
Well, that you’d need to do manually. To find out all the registered blocks, you’ll need to use the function wp.blocks.getBlockTypes(). That will return an array of all registered blocks (as objects) along with all other parameters such as their attributes.
Here is an image of the ‘core/paragraph’ block returned by that function:
After all that, we need to insert the object we created with the function createBlock.
We do that using the data package that is used to create a store ‘core/block-editor'. Then we dispatch a function registered to that store called insertBlocks.
Inside that function, you can also control on which position can you insert the new block.
Finding indexes
Positions are indexes that are basically a number representing the order of rendering the blocks.
To get all orders of blocks with the block IDs, you can use again the same store, but instead of dispatching (performing an action), you can select an information (get data).
By using:
wp.data.select( 'core/block-editor' ).getBlockOrder();
You’ll get an array with contents like this one:
  "25e4a428-7be0-4af5-b725-43de96be1357",
  "9b42e2a1-49bb-40d4-932e-576661280ce4",
  "93c65f07-77c3-47f6-b607-a658526ef330",
  "7492daeb-f0eb-4fe6-875a-04ed810f3e46",
  "e8558ce4-3718-4548-837b-e13e842b4b90",
Now, from here, you can understand that a block with ID 9b42e2a1-49bb-40d4-932e-576661280ce4 has index 1 (second place).
Finding the Selected Block
What if you want to programmatically add a block after the one you currently have selected?
You can get the selected block with wp.data.select( 'core/block-editor' ).getSelectedBlock();.
When you use that function, you’ll get. a block object with a clientId.
You can use that clientId to find its own index with:
const selectedBlock = wp.data.select( 'core/block-editor' ).getSelectedBlock();

const nextIndex = wp.data.select( 'core/block-editor' ).getBlockOrder().indexOf(selectedBlock.clientId) + 1;
That way, the nextIndex will contain the index of the position after the selected block.
Conclusion
By understanding all the available methods in the main store core/block-editor you’ll be able to manipulate the whole editing experience.
With that, you can enhance the experience of your client using their site.
When in doubt, use the console to find everything available under the global wp variable with the help of the Block Editor Handbook.
Share this: