
Gutenberg is coming and we need to be prepared for it. In this tutorial, we will learn how to create a block that will display a post.
Last edited on May, 15th so the code can be used with the lastest Gutenberg release. Thanks to all my readers for providing feedback.
Preparing the Plugin
For our own Gutenberg Block for Display a Post, we will use the npm package Create-Guten-Block from Ahmad Awais. You will need to have npm and node installed on your machine. If you don’t have them, check this site and follow their install instructions.
Also, install the package create-guten-block by typing npm install create-guten-block --global so you can access it in any folder.
Since I will use that package, I don’t need to create a base of my plugin. Everything is done from there. I only have to place myself inside the plugins folder of my WordPress site (through the command line/terminal) and type create-guten-block guten-load-post. This will create a plugin guten-load-post. Once it’s installed just place yourself inside that folder with cd guten-load-post and then start it by npm start. You’re good to go for developing your own block.
Files
The folder that we will use is src/block and the files inside are block.js, editor.scss and style.scss. We do have some code populated there so we have the essentials placed. Since I won’t use the front styles, I’ll have the content from style.css removed. Just leave it empty if you want o do something else later with it.
Inside the editor.scss I will place these:
This style rules will have a simple animation when loading the post.
The file block.js is the main file that we will use and the code we will write in this tutorial will go in there. Let’s just change a few parameters here such as title and keywords:
Activate the Plugin
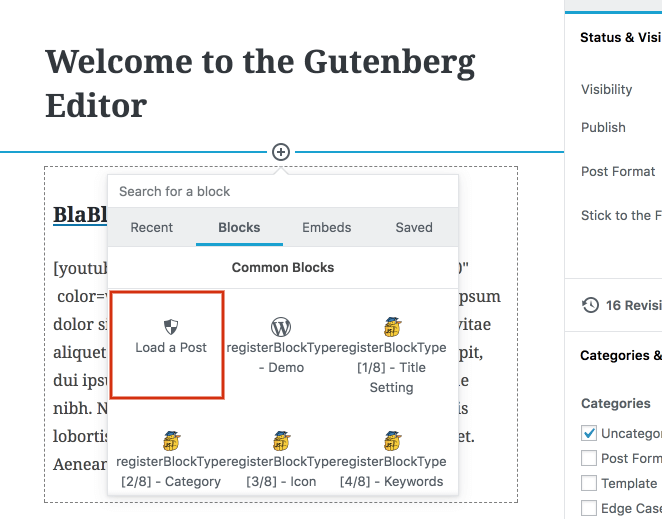
Now go to Plugins and activate our plugin. For now, it should be called something like “guten-load-post — CGB Gutenberg Block Plugin”. You can change that in the file plugin.php.
Load a Gutenberg Post and check if our block is there. It should look something like this:
Understanding the Workflow
Before we get into creating our Gutenberg Block for Displaying a Post, we should understand how that will work. That way we can plan the block better.
So, the first thing we would need is a way to select the post to display. We will have that as a Block setting in the form of a drop-down of recent posts. Once the post is selected, we will get that post object and set the title, URL and excerpt from it as attributes.
To control how this is rendered inside the Gutenberg we would require states. With states, we will know which content or message to display. Instead of a regular edit function, we should use the React Component as the edit function so we have everything we need to manage states.
Gutenberg Block Attributes
Attributes are those that you can use to change how something looks. Similar to State in regular React. We will use that here to store our post information. Let’s set them after the keywords:
The attribute selectedPost will be set here as the ID of the post. You can then use that to filter the post or anything else related to that post. Other three attributes are self-explanatory: title, link to the article and content (excerpt).
Gutenberg Edit Component
Now, we will work on the edit component (function). We now need to import several parts for the edit part to work for our Gutenberg Block for Displaying a Post.
Let me try to explain what we did here. Besides importing registerBlockType from wp.blocks, we are also importing InspectorControls so we can have custom block settings (on the right sidebar in Editor).
Since we will also need a drop-down control, we are importing SelectControl from the previously imported InspectorControls.
The last import is Component for creating custom React Components. After we have everything set, we can create our custom mySelectPosts component and put it in place of the edit function. For now, we are just rendering a simple sentence there to test if we are correct.
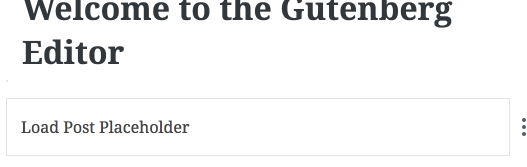
Be sure to reload the Gutenberg Editor by refreshing the page and try adding our new block. It should show something like these:
Preparing our Component
Before we dive into more coding we need to prepare our component. This means that we need to setup the state and also the drop-down. We should be getting this when we click on our block (after using the next code):
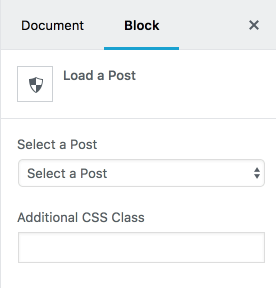
We need a drop-down for selecting a recent post. This will be done inside the InspectorControls. For an easier understanding, just view it as a metabox (container of fields) for the Gutenberg Editor. With InspectorControls we can add as many inputs (controls) as we want.
In the code above we have created a method to set the initial state. This method is called in the constructor method. We are setting the initial state and also by using super(), we are setting everything up and enabling our own properties to be available in it.
Inside the render method, we are defining options that will hold all the posts that we can select. For now, we have only one option. The last thing we do is refactor the return. Now, we are returning an array so that we can have more than 1 return value.
We are checking if our block is selected with !! this.props.isSelected. If it is, then we are enabling the InspectorControls. We are putting our SelectControl as an element of the wp.components. You can put as many controls as you want there. The value of our control will be the select ID of the post and the options that represent the posts we can select are placed inside the options attribute. For now, we won’t have any posts to select.
Creating the Output
Let’s now change the text in the render method. We want the text to show the status of our block. If we have some posts, we will tell the user that he should select one. If there are no posts, then we will tell our user to create some.
At the beginning of the render method, we are defining another let variable output. This will hold the status of our block or the selected post. The first status will be Loading Posts. If there are no posts, we will show that the user should create some. If there are posts, we will then add them as new options inside our variable options.
If you save this and try to add our block inside the Gutenberg Editor, it will show that there are no posts found. That is because we have yet to define our method that will load the posts.
Loading Posts
For loading our posts, we need a method that will do just that. And we will also call this method when the block is created (inside the constructor method).
In the constructor method, we are binding getOptions method to this so that we can have access to attributes and method through this inside the getOptions. After that, we are also calling that method so that we can get those recent posts right after the block has been created.
Inside the method getOptions, we are fetching the latest posts through wp.api. We are checking if we have retrieved any posts. If there are any posts and if we already have a selected post, then we are finding that post. The last part is updating the state of our component with posts and the found post.
Do not that we are using modern JavaScript here so you don’t have to set the key in the objects if it’s the same name as the variable we are putting in. That is why we are using { post, posts } instead of { post: post, posts: posts }.
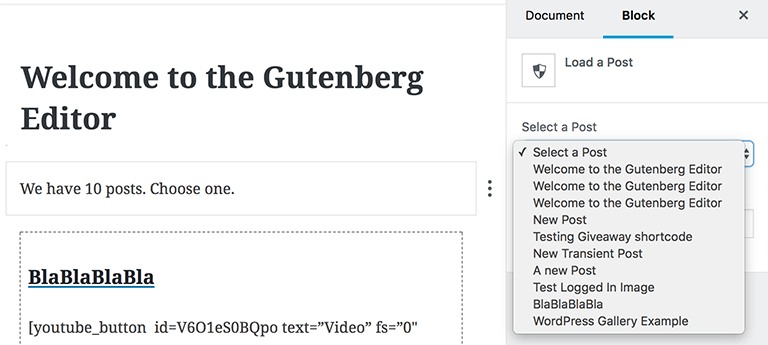
Now, if you reload your Gutenberg editor (so the JavaScript reloads) your block will say that there are some posts loaded. You can go in the settings of the block and see a list of found posts.
Saving the Selected Post
To save the selected post, we need to have a method that will do that once our SelectControl changes its value. We will create a new method onChangeSelectPost and we will put that method as an onChange event in the SelectControl.
We are binding our new method to this inside of the constructor method so we can have other methods and attributes available through this.
First, we are finding a select post by the value provided. The provided value will be an ID. After that, we are setting the state and attributes. I did not check if the post is found here, so you can do that for practice.
Inside the render method, the only change we did is to add our new method to an onChange event.
Displaying the Selected Post in the Editor
We now have everything in place and the last part of our Edit Component is to show the selected post. We will do that all inside the render method.
First, we are setting a class loading. After that, we are checking if our post inside the state has a property title. If it has, it means that we have loaded posts and found the selected one. If that property is not found, then it means that the post is empty.
If it’s empty, then we are adding a class no-post. If there is a post, then we are using JSX to create the output. We are creating a simple output with a linked title and some content. We could (or even should) use the attributes here, so be sure to try that out as a practice. We are also using dangerouslySetInnerHTML to render the content with encoding. You can read more about that here: https://reactjs.org/docs/dom-elements.html#dangerouslysetinnerhtml.
The last thing is to wrap the output in a div element with classes. This will also add our class that we have defined in our editor.scss. We are now done with the Edit part of our Gutenberg Block for Displaying a Post.
Gutenberg Saved Output
To define how our block will look in the front of our site, we need to edit the save method of our block. We will use attributes here in creating the whole output. It is not so different than the output of the edit component.
Save everything and try to reload the Gutenberg Editor. If you have already tested the outcome of this block, you will get an error on your block. You will have to click on the Overwrite button.
Conclusion
Creating Gutenberg Blocks can be a lot of fun. You can write this blocks even with ES5 JavaScript. I would recommend you to try and switch to modern JavaScript.
In the above code, there are a few parts that could be refactored and I would invite you to try and do that.
Have you tried building your own Gutenberg Blocks? Were there any struggles you had when building one? Show us what you did in the comments below:)
Join the Webinar!
Can we download the plugin for test? Does it work with more than 100 posts in system? I am looking for solution for more than 100 entries, I can’t find one. I have already asked at other blogs but no answer (billerickson.net/building-gutenberg-block/)
I am using the backbone client through
wp.api.collections.Posts()and for more posts you would have to pass that option when fetching the results. Check out the REST API Handbook: https://developer.wordpress.org/rest-api/using-the-rest-api/backbone-javascript-client/#collection-examplesThank you, but I have tried all options but can not get more results as 100 in one pass. 🙁
It seems that 100 is the limit now. But you can try something like in this answer: https://stackoverflow.com/a/40731670
Unfortunately this does not work.
Sorry about that. You may need to paginate through the results then.
How would paginate work in a code like the “Select a Post” dropdown in your plugin? I am not coding so good, maybe I do not see something, please help.
Thanks for this. Its the nearest of what I hope as answer to the use of select fields in Gutenberg Block admin. My purpose rejoins Hendrik’s question because a selector of over 100, even over 20 is of no practical use. Do you know about adding autocomplet capacity to SelectControl. In the way of select2, reducing the option list with each char typed in an imput field.
I had hosted a webinar on using autocomplete https://www.youtube.com/watch?v=2wM6VyJ9Dp4. For now, it does similar as the dropdown in here. But maybe the trigger in the autocomplete can be used to search for related posts.
Good stuff Igor!
I’m trying to figure out how to pull a featured image, along with the post’s title, link and except — but I’m running into a few snags. Any advice you could point out for me would be super appreciated!
Hi Rich, really glad you find it useful! To pull the featured image, you would need to create an additional fetch on it. Each post JSON has a
featured_mediaattribute. This holds an ID. Then you can fetch the media info through/wp-json/wp/v2/media/{MEDIA_ID}. The retrieved object would then have an attributesource_urlthat will hold the featured image URL.Maybe the easiest approach would be to create a custom REST endpoint to retrieve only what you need for the Gutenberg block:D
Ah, interesting! Thanks for the pointer — I’ll see what I can do. 👍
Hi,
Thanks so much for the tutorial! There are very few resources available for building Gutenberg blocks, and none that I’ve found have gone as in depth as yours. I really appreciate you taking the time to write yours.
I did run into an error around blockedit2.js:
‘Element type is invalid: expected a string (for built-in components) or a class/function (for composite components) but got: undefined.’
I was able to fix it by changing the declaration of SelectControl to the following:
const { SelectControl } = wp.components;
It’s likely the error was my own doing, but thought I’d throw it out there just in case others are having the same issue. Other than that, everything ran fantastically. Thanks again! 🙂
Thanks, Chris, that changed declaration helped me!
Awesome and very useful tutorial, i struggled to find a good example of querying posts in a Gutenberg block, so many thanks !
PS : i had the same issue than Chris, resolved the same way, probably from a Gutenberg recent release.
Beginner’s question. In G 2.8.0 focus has been “replaced” with isSelected.
How to adjust your code to this update?
Alright, I found that it is as easy as writing
!! this.props.isSelectedBut my problem came from the other flank. I had to change
const { SelectControl } = InspectorControls;toconst { SelectControl } = wp.components;Also, I couldn’t simply append ‘ loading’ this.props.className
because the nature of the property
Uncaught TypeError: Cannot assign to read only property 'className' of objectHi Przemek, I’ll look into that and update the code accordingly. It will probably be updated in a few days when I get some free time.
For anybody else that gets stuck on this… The InspectorControls is no longer with wp.blocks, but instead is under wp.editor:
https://wordpress.stackexchange.com/questions/304525/implement-panel-color-inspector-control-in-gutenberg
It would not work for me with Inspector Controls.
This article explains a bit more about components being moved to the editor module.
https://atomicblocks.com/gutenberg-dev-tip-move-your-components-to-the-editor-module/
Awesome and very useful tutorial. how can i directly show list of all post-title list without select-box.
Hi James, you would have to create a list (UL/OL) or any other HTML element to create them and use the same approach of filling as we did with the dropdown. You can then use the permalink from the JSON to create linked items and such.
Hi,
Do you have a github/ sample code for the autocomplete webinar ?
Thank your for this helpful tutorial. I got everything to work – it’s just one problem:
If you edit the post (that you had selected before with your block on a page) you get
an error message on the edit page screen saying that the content was edited elsewhere.
To fix that we would have to only save the post id and fetch the selected post in the save method again to get the actual content? Any hints would be nice!
Hi Karl, I did not have an issue like that for now so I can’t tell 100% how to fix it. If I ever experience such issue, I’ll investigate it. If you come up with a solution, let us know in the comments 🙂
I ran into a similar issue. I noticed that all attributes were coming through with the page reload except for the content attribute. I had luck by changing the content attribute to the following:
content: {

    type: 'string',

},
Thank you Eric, for posting your solution!
Do you have any thoughts on how you could get the selected post data in a form that isn’t rendered? My goal is to get all of the blocks of the selected post instead of the rendered HTML of those blocks. Is this possible?
Hi Kory, what do you mean by that. You want all the blocks of the selected post to be inserted instead of the classic excerpt/description?
Or is this unrelated to the tutorial? If so, since the blocks content is saved in the post_content column you could get the whole raw content of a post and then see how Gutenberg parses the content to create blocks through JavaScript (or maybe even PHP).
Thanks for your reply, Igor. My question is derivative of this tutorial, my end goal is definitely different, but for the sake of discussion let’s say that yes, I’d want to get all of the blocks of the selected post to be inserted into the Gutenberg editor instead of the excerpt/description. Whenever I was trying to access post_content, it was served as “rendered” and no longer had all of the relevant Gutenberg block data.
What I’m trying to build is a custom translation block to work with WPML (or other translation plugin of choice). What I envision is that when you first create a new translation page, you can add this custom block, which will fetch all of the original page’s blocks and then add them to the editor in a 2-column layout. The left columns will be the original page’s blocks and the right columns will be empty, waiting for you to write out the translation of the adjacent block. It’ll make the work of my colleagues much easier to have the original copy on the same edit screen.
It seems like the Gutenberg Data Module (wp.data) will be a key part of making this work and perhaps the @wordpress/block-serialization-spec-parser (Javascript) and/or gutenberg_parse_blocks (PHP function).
I have tried this but as I click to add the block, it gives me a blank white screen. Need help please
Thank you for that post!
I used ( new wp.api.collections.Posts() ).fetch(). … and it worked flawlessly until some recent versions of Gutenberg. Now the console says “TypeError: Cannot read property ‘collections’ of undefined” when ever I try to add that block. ‘collections’ is not used anywhere else.
Do you know if there has been a change in Gutenberg, or what could be the reason? Thanks!
Hi Christoph, it seems to me that wp.api is not available globally. If you’ve never enqueued that or set it as a dependency, then Gutenberg probably used it and dropped it in the recent update.
I’ve checked and it seems Gutenberg is now using a wp.apiFetch. But you should be able to use wp.api if you add it as a dependency on your script. The dependency name is ‘wp-api’. You can check it out here: https://developer.wordpress.org/rest-api/using-the-rest-api/backbone-javascript-client/
Thanks, Igor! What I eventually ended up doing is:
import apiFetch from ‘@wordpress/api-fetch’;
and then
apiFetch( { path: something } ).then( items => {
…
});
Thanks Christoph. I ended up doing the same thing (because I could not get wp-api to work, even as a dependency). Here is the apiFetch line for this tutorial..
apiFetch( { path: ‘/wp-json/wp/v2/posts’ } ).then( ( posts ) => {
Using the Gutenberg Block Creator (GBC) npx script, I ended up using just ‘/wp/v2/posts’ as the path.
@Marty and @Christoph, your comments were really useful, thanks.
Can we edit thisto have a custom post type instead of a post?
Hi Thomas, sure you can. You need to change the way you fetch the data.
Hi Ivan – is there any references or links on how to do this? I am thinking about adding withSelect() in the edit property then using getEntityRecords() for bringing in the custom post type. If there is a better or more effective way, if so – would there be a tutorial or reference on it. Thank you so much for the reply and a great article on a Load Post block.
Hi Thomas, it’s Igor, not Ivan 🙂
This article might help you a bit: https://riad.blog/2018/06/07/efficient-client-data-management-for-wordpress-plugins/
So sorry Igor. Didn’t realize I typed the wrong name. Thank you for the link.
There are some missing bits about frontend display.
Can we get more detail about block frontend display to visitors, template and `$post->content`?
Hi Ralph, there is no special template for the front end. It’s the one in the method
savethat will be saved in the post content as it would be if you would write that HTML in the old WordPress editor.Do you have a solution for custom post type?
Hi Orkan, I don’t have a solution. If you want to use this with a custom post type, you need to enable the rest API for it. Then that custom post type will also be available as the collection which we’ve used here. You can read more about it here: https://developer.wordpress.org/rest-api/using-the-rest-api/backbone-javascript-client/#collection-examples and here https://developer.wordpress.org/rest-api/extending-the-rest-api/adding-rest-api-support-for-custom-content-types/
Thank you Igor.
I will look at these links.
For those interested, ACF version 5.8.0-beta1 and up comes with their ACF Blocks feature.
https://www.advancedcustomfields.com/blog/acf-5-8-introducing-acf-blocks-for-gutenberg/
Igor, I’m not one who normally makes superfluous comments but you guided me through the thorns of a problem that I spent way more time on than I should have. WordPress owes you because there isn’t anything else like this on the web as far as google is concerned. And I owe you twice as much as WordPress owes you. You’re doing god’s work.
Thank you Rick! 😀 It does feel good to get such comments!
Glad I came across this post – just that when I get to npm start I get error:
node_modules/cgb-scripts/config/externals.js:36
…externals,
^^^
SyntaxError: Unexpected token …
I ran npm install –save-dev babel-plugin-transform-object-rest-spread in project directory but still error. ANy idea how to fix this?
thnaks!
Hi Brian, not sure. I will have to go over the same code and see what is wrong here. Maybe the script has changed a bit.
I just upgraded to node 9 and all is working. So something to do with my 8.2 (as well as 8.6) setup on MAC. Thanks for the great tutorial!
Hi Igor,
Great Post. I like to go step by step and create my first Gutenberg block.
Just 2 things I noticed where one is already addressed in comment section,
wp.api.collections.Posts() for which I just modified init.php and add the “wp_enqueue_script( ‘wp-api’ );” It solved my problem. But another is, InspectorControls which I found that it moved to wp.editor instead of wp.blocks
I think you can update that otherwise the above code through an error in console.
Thanks for what you did, kudos 🙂
Hi Tapan, I probably have to update the whole tutorial on this part since Gutenberg changes day by day and they move packages alot.
That’s great. I would love to get a new tutorial from you. Thanks
Very helpful tips…You saved my day….
Uncaught SyntaxError: Unexpected token ‘<'
I am getting this error for
<h2 dangerouslySetInnerHTML={{ __html:
Can you update this so it works with the apiFetch etch changes? I don’t follow how to change the code to make it work with apiFetch from the comments. Just get loads of errors
You can nuke my previous comment as I worked out how get wp-api enqueued and it started working. However I’m running into other issues:
I’m sure it’s just a problem with cutting and pasting in the bits from your article, but it’s hard to find where. Do you have a full file somewhere I can just use and see if I can get working?
I’m finding learning how to make Gutenberg blocks almost impossible. I’ve being building themes and plugins for a while, but learning React, NPM, webpack, JS etc is just an enormous mountain to climb and every tutorial out there I try is out of date meaning I never really get anywhere. Really quite impossible :/
Even the learn Gutenberg stuff on WordPress.org does things slightly different across the tutorials which is really confusing.
My error message was being blocked by Wordfence. THat’s not helpful!
the error was “Cannot assign to read only property ‘className’ of object” on the line where ‘ loading’ is being added on the 3rd line of the render function
Is there any way to do this with Custom Post Types?
Should be, but you’d need to check REST APIs for custom post types.
I think those should be available in core, but not 100% sure.