
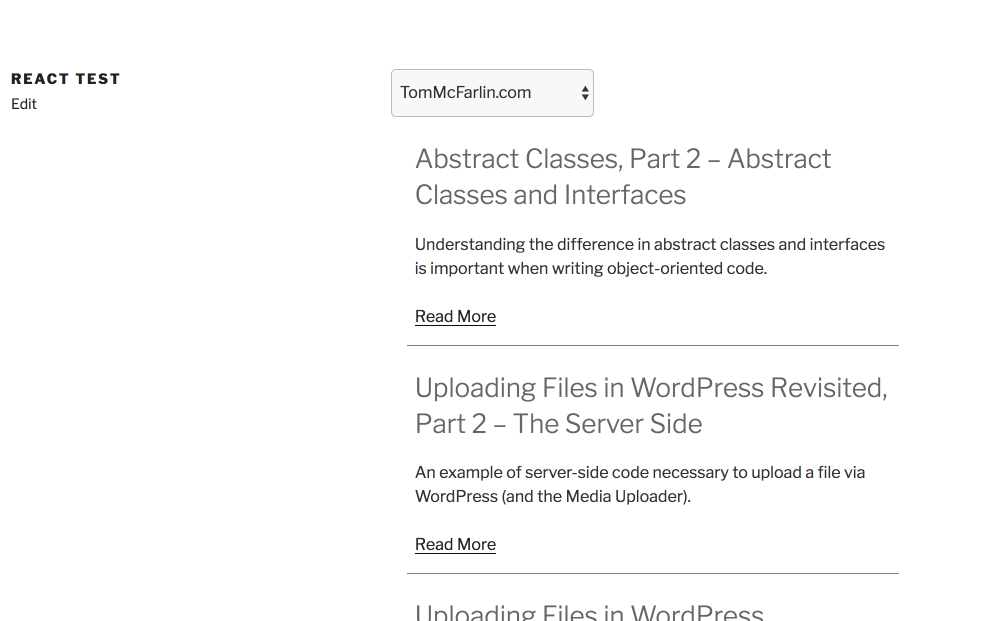
Sites powered by newer versions of WordPress have the REST API enabled by default. In this tutorial, we will use React to pull the latest posts from such sites and render them as articles with a summary.
If you are interested in the end result, you can view the codepen below (it might take a few seconds to load).
See the Pen Using React with WP REST API by Igor Benić (@igorbenic) on CodePen.0
The video tutorial is here. Beware, it’s a 40-minute long video because I have not excluded any errors from it. You will see my mistakes and how I fix them. Reading the tutorial might get you there faster since it’s error-free.
Resources Needed
Since I’ve used CodePen here, I did not need to compile the JSX or any ES6 JavaScript. For you to use such code and compile it into a usable JavaScript code, you would need to use some of the known tools such as Webpack or Gulp.
The resources you would need for this code to work are:
- Babel: https://babeljs.io/docs/setup/
- React (doh!): https://reactjs.org/docs/try-react.html
- ReactDOM: https://reactjs.org/docs/react-dom.html
If you want to add React to your existing plugin (or theme), you can check out this guide: https://reactjs.org/docs/add-react-to-an-existing-app.html.
I also have a tutorial on Configuring Webpack in WordPress for the First Time. You can use that configuration and just add React and ReactDOM.
You can add the JavaScript to a file and have a simple shortcode to display the HTML. Enqueue the JavaScript file where the shortcode is displayed and you will be good to go.
HTML
We don’t have much HTML to write here. The JavaScript will do everything and we just need to start it by providing an HTML element.
<div id="app"></div>
That’s it! We will use the #app in our JavaScript. You can change that ID with whatever you like.
Starting React
To start our React app on the #app we need to render a React Element into our HTML using ReactDOM. Here is how:
First, we are creating a class, in the same way as you would extend a class in PHP. This is a part of ES6 so you would need Babel to compile it. The render method is used to display the content of our React app (HTML).
We are assigning our App class to const element. We are using const because element will never change (or at least it should not). If we try to change it somewhere in the code, an error will let us know about that. We are then passing the element into ReactDOM and appending it to #app.
Creating a Dropdown of WordPress sites
Now that we have our App started, we need to populate it. The first thing will be to create a simple select with sites as options. Each option value will be a direct link to the site’s REST API output.
The select will be rendered inside the App render method.
We are also wrapping it with div because we will have another element inside. In the render method, only one parent element can be there, so we are using div to wrap all the child elements.
With the current code, we would get an error that WPSitesSelector is not defined. So let’s do just that.
It might seem a bit confusing but just by reading the comments in the code, you should get the basic idea of what is happening here. Such as with any other method, we can also put some functional code inside the render method.
First, we are defining const data (this might also be let if you decide to add new data to it). All the data will be converted into options. We are then using the data and with the function map we are returning React Elements and building an array of JSX elements.
Once we are done with that, we are displaying that inside the select.
Introducing State and the Fetch method
When getting data from external sites, we need to store that data somewhere. We will use the React State to save them.
But before we do save them, we need to get that data, correct? Our root class App will have both of that. Let’s extend our root class now:
The first thing we did is a constructor method. It is similar to the __construct method in PHP. This will prepare our component with everything it needs to function correctly.
The function super in PHP would be parent::__construct(). By sending props, we will have access to this.props. In our root class, we could just go by calling super() since we are not accessing the properties.
The next thing we are doing is binding the method getPosts to this. That way, the newly defined method will have access to the entire object through this. The last thing we do is to set the initial state by putting an empty array of posts in it.
The Fetch Method
Our method getPosts is our fetch method. If we provide an URL, we will try to fetch the data from it. You could go with jQuery AJAX here, but we are using fetch. You can learn more on how to use it here. Fetch won’t return the fetched value but a Promise (learn more about it here). When working with promises, we need to use the method then() to continue the work with the retrieved data.
In our example, we are using 2 calls with then. The first one will convert the raw data into json. The second one will get that json and pass it into the state. If the syntax is a bit confusing to you, I could do that like this:
var self = this;
fetch(url)
.then( function( response ) { return response.json()})
.then( function( posts ){ self.setState({posts: posts})});
The syntax I am using is the Arrow functions. The neat thing about them is that I can access this directly. In the example above with normal functions, I had to define self so I can access the object.
We are passing this method getPosts as a property to our component WPSitesSelector. That way, we will be able to access it through properties and call it. By passing the URL in that method, the root method will be called and the state will change. That is also known as Inverse Data Flow.
Listening to Change Event
Before we get any data from the URLs, we need to listen to the change event on the select. So, how can we do that? We will have to enable the properties and also listen to the onChange event. Let’s enhance our component WPSitesSelector.
Again, we are using the same approach to enable access to properties. We have also defined a new method handleChange. Since this method will need access to properties, it needs access to this. That is why we are binding it in the constructor method.
In the method handleChange we are calling the passed method from our root as the property getPostsOnChange and we are passing the selected value to it (the URL).
For everything to work, we had to define which method to call when the onChange event occurs. That is done through JSX in the render method.
Rendering the WordPress Content
Until now, we have defined how to retrieve the data and how to listen to the change event. The last thing we need to do is to render the retrieved data. First, we will define a React component that will be used to render the list of articles. Each article will also be another React component.
WPSitePosts Component
This will be the component that will list all our articles. Let’s add it in our root component App:
In our root component, we are also passing our posts from the state as a property to that component. Do you already know what we have to do? super to the rescue! 🙂 Let’s define our component now.
Inside the render method we have defined let posts. This time we are not using const because we need to be able to change the value of the variable posts.
We are checking posts passed as a property and if there is none, we are giving a message. If there are posts, then we are using the function map to create a list of WPPost components.
WPPost Component
The last part of this tutorial is creating a component that will define how a post will look. Inside the WPSitePosts component, we are passing each post into its own component as a property. We will access the contents of a post through the properties.
Inside the render method we are using the attribute dangerouslySetInnerHTML because we are getting the raw HTML. We need to encode the content and by that attribute we can.
Creating a Plugin
To use this in a plugin, you will need to create a shortcode that will render the initial HTML. After that, we would need a configuration (webpack) that will compile our JavaScript into a usable code. I’ve created a simple plugin here that you can download, run npm install and npm build to see it working.
The plugin will work immediately since I have shipped the compiled JavaScript, but with the configuration files, you can learn how to build one yourself.
Let’s dig into how to do that here also. Before we start configuring our webpack, create a folder react-wp-rest-api and a file react-wp-rest-api.php. Add basic plugin information and add the shortcode:
<?php

/**
 * Plugin Name: Using React to render WordPress Content with REST API
 */

if( ! defined( 'ABSPATH' ) ) {
    return;
}

/**
 * Display the WordPress Render Conent through React
 * @return void
 */
function react_rest_api_shortcode( $args ) {
    return '<div id="app"></div>';
}
add_shortcode( 'react_rest_api', 'react_rest_api_shortcode' );
This part is available only to the members. If you want to become a member and support my work go to this link and subscribe: Become a Member
Conclusion
At first, just hearing React, JSX, ES6 etc can be a bit scary. It was to me too. But after you start writing it and reading the documentation, you will start getting it. The hello world examples are just fine to get you started. Remember, you won’t learn it until you try building something.
So don’t be afraid to do something. Even if you’ll have to rewrite 90% of the code while working on it.
Have you tried working with React? What were the struggles you had by learning it? Tell us in the comments below.
If you’re interested in some other React tutorials that I have written check these:
- How to create a WordPress Login Form with React
- How to Create a WordPress Widget with ReactJS and REST API
- MailChimp WordPress Plugin with React: AJAX & React
HTML render issue solved, by reading your article
Hello,
I want to show order notification in my react dashboard from woocommerce. I tried webhooks and other things but not working for my.
i want to show notification instantly from wordpress store in my react dashboard when someone do order.
Can you help please?
Hi, for that to be displayed to you in your react dashboard you would need either to ping your store every minute or so (maybe every 5 minutes) via a REST route for new orders and display them there.
Not sure if websockets would work here. You can check that out.
You are rendering plan HTML using “dangerouslySetInnerHTML” which will render the post content perfectly. If I have used Gutenburg Gallery, images, and other Gutenberg components in the post how will I render this content?
Those components should be saved as HTML so they should be rendered fine as well if they’re static. But you’d probably have to copy their styles and script as well.
In case they’re dynamic, then you’d need to filter the rest API response and convert them into HTML (I think that is already done there, so you should be fine).