WordPress Media Uploader Custom Fields can be used for storing various information. You can create a relationship between other data such as adding users to the picture or writing additional information about the image. In this tutorial we will learn how to add custom fields to the media uploader.
We will create two fields here:
- Info – textarea
- Tags – checkboxes to tag users
Adding a WordPress Media Uploader Custom Field
To add a field you need to filter the hook attachment_fields_to_edit such as this:
You then add a field by providing the field key/name as key and then an array that will define the field. To see some of the default fields that are set there, go to wp-admin/media.php and find the function get_attachment_fields_to_edit.
Saving a Custom Field
When we add a field, we also need to save it. This can be done in hooks edit_attachment or attachment_fields_to_save. The first hook is an action and the second one is a filter.
Since filters return data, if you are using the second one, you will need to return the $post. This filter can be also used to set error messages.
Adding a Media Uploader Textarea Field
Let’s now do some actual coding. We will now add a simple textarea field and save it. Let’s see how to add a custom field:
First, we are getting the value for the provided attachment ($post). After that we are adding that field here and providing the value parameter with the field’s value. To render our field as a textarea, we will have to set the parameter input to textarea.
Saving the Textarea Field
In this tutorial, I will work with the hook edit_attachment. We will use that hook to save the data.
We are checking if the field is set for our attachment by checking . That is because the custom fields are rendered like that. If that field has been posted, we will save the data.
You would need to validate it and sanitize it before saving it, but that is out of the scope of this tutorial.
Adding Media Uploader Field “Tags”
The Tags field will be a WordPress Media Uploader Custom Field that will render all our users and then we can tag them by checking them. We can look at it as we tag people on Facebook.
Here we are getting the tags from the database inside the variable $tags. We are also getting all the users registered in our WordPress site. Next, we are creating a custom html that will hold all our users with checkbox next to their names.
Since the custom field is made in this way:
we will have to create the attribute name in similar way. We are adding the tag key with the user’s ID as a key.
The last part of adding this field is to extend the variable $form_fields with our field. To provide our custom html as the input’s output, we need to add that output to the parameter html and also assign 'html' to the parameter input.

Saving the WordPress Media Custom Field “Tags”
When we check or uncheck a user, WordPress will send a POST request to our site. Since all of those checkboxes will be in a form:
We will just need to get the tags which will be an array of key => value pair and save them:
Conclusion
Adding custom fields can be a challenging task. You need to know a little bit more than just writing custom HTMLs. The WordPress Plugin API provides us with the hooks so that we can extend the current fields with others.
Have you ever added a custom field to the attachment page? Please share your experience here with us:)
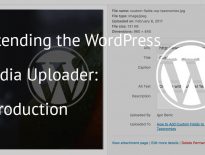
If you want to jump to an article, you can do it here:
- Introduction
- Edit Fields
- Embed Options
- Editor
- Custom Tab
Very useful, code worked well for me. Great job. Thanks for sharing.
No problem Jethin! Thank you for reading and trying out the code.
Hi Igor,
Thank you for your great tutorial. It saved me a ton of timea and I applied the exapmles to add my own custom fields to one project I’m working on. But there’s one thing troubling my mind.
How would you handle clearing the checkbox values? I mean – how would you save empty values?
I kind of managed to create a working solution for this situation with a if-else statement that checked if the checkbox was set ,the same way you have on the last example on line 16. And if it wasn’t checked then the meta value would get deleted.
I noticed my solution caused a problem, when updating the WP native media title, alt or description fields on the Media Library grid view attachment details dialog (I mean this, https://codex.wordpress.org/File:attachedfile-detail.png).
The ajax call the details dialog makes when it saves the changes to the title, alt and description fields doesn’t include the custom fields (I checked browser dev tools > network > param). This basically means, that the custom checkboxes are “not set” even if they’re checked, but not changed. This in turn this fires my if-else statement and wipes the checkbox meta from the database and I have to re-check the checkboxes.
So, would you have a suggestion what the if-else statement should be like to enable clearing the checboxes while protecting the saved checkbox values from getting wiped out by updates to other media file’s fields?
Regards,
Antti
p.s. My apologies if I explained myself in a unclear way.
Hi Antti, does your solution follow the code in this article or is it implemented in another way?
Hello, great article, works well. I’m wondering if it’s possible to create a custom field with a select menu.
Also; is there a way to add categories and tags to media? My site will be only photos so using categories and tags will be very useful. Web search only finding old articles that work, almost…the fields display but existing categories and associated selection boxes don’t display.
Thanks in advance for any assistance.
HI Steve, that should be possible. You would just need to get all the saved menus and put them in a select box. You may use the same for categories.
To see how the menus are retrieved, you may want to read how the widget “Navigation Menu” pulls that information.
As for tags, you might need to look into how the tags are done for Posts. In general, you will always have an input field (or other types such as select or textarea) and check if it’s posted. If it is, you’ll save it.
You may have a challenge using JavaScript here, but it is doable. Just be sure to always attach your events to the DOM such as
$(document).on( 'keyup', '.media-select-tags', function(e){});. That way, when you load the media uploader screen, you have the attached event again.Another way you could approach it is to add all those fields at the edit screen for each media. The only downside is that you won’t be able to edit it through the media uploader (if you just add those fields on the edit screen).
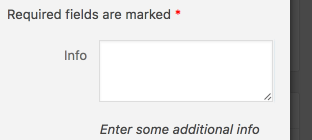
Hey, thanks for sharing this snippet. It works perfectly. Right now I am curious on how to Position the text area flush with the default ones.
Ill attach an Image that visualizes what I mean. I can’t seem to figure out how to Position it.
Attached Image: https://imgur.com/a/CzSpeSK
Thanks. Willi
Hi Willi, I am not sure I understand what you mean by positioning? I see the fields are positioned correctly. Do you mean to position them above or below some fields? If so, I have not tried it, but I guess you would need to rewrite the whole template to define the position of fields.
Thanks for the reply. I meant the fields directly underneath the default fields. BEFORE the “fields are required” message, if that makes sense.
It’s entirely just for beauty though. Was just curious, I kinda like things streamlined. Was hoping there was a simple thing to it, to do so.
Any idea how to make this work with WordPress 5.1? The custom field no longer displays for me when editing a media library attachment.
Hi Daniel, I’ll have to check it out and see if that’s possible.
Hi Igor Benic,
Can you guide me how to add wysiwyg custom field to media modal?
Best Regrads,
Hi John, I was not able to do that. I guess this should be done with JavaScript when the modal is loaded so something like this might help you: https://wordpress.stackexchange.com/questions/274592/how-to-create-wp-editor-using-javascript