When we are trying to insert a file using the WordPress Media Uploader, we will embed them. For images those are attachment display options, for videos those are embed options etc. The embed options can be used to insert something more such as a new format or similar. In this tutorial, we will now see how we can add a new field as an embed option to that part of the WordPress Media Uploader screen.
I have worked on a project which required such functionality. I had to add different format for a video which would have on embed option. When it comes to images, there would be much more embed options. We are going to see how we can add new embed option and also use it for images.
Changing the WordPress Media Uploader Template
For us to be able to add new embed options, we need to change the template. This will have to be done using JavaScript by assigning new template instead of the old one. How do we do that? Let’s begin.
First, we need to add our script to the admin footer. But we will only add it when the WordPress Media script is enqueued.
Creating a new Template
The template we need to change can be found at wp-includes/media-template.php and the name of our template is tmpl-attachment-display-settings.
We will need to copy the whole template, name it a little different and use it. Let’s now add that template and also add a new field at the end:
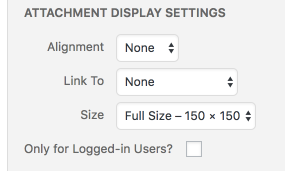
At the end, we are checking if the attachment is an image and then add a checkbox that we will check if we want this image to be only displayed for logged in users.
On the input field we got two attributes: data-setting and data-user-setting. Both have the same value. This value loggedIn will be used when sending the attachment to our editor. Since, such setting is not there by default, we will need to extend the function where we are sending the attachment to editor (later in this tutorial).
By placing this template at the admin footer, we got nothing.
Replacing the Template
The new template has to be used in the place of the old (original) template. This will be done in another script:
With this code, we are first saving the original Backbone.js view into the variable attDisplayOld. After that we are extending that display but adding a new template to it, which is our new one. The extended display is then being assigned to the wp.media.view.Settings.AttachmentDisplay. That view is used to rendered the edit screen inside the WordPress Media Uploader.
If you try to add an attachment to the editor, you can see our new field as an embed option.
Sending new Setting to the Editor
When we hit the button Insert into Post, WordPress will perform an AJAX request and add the HTML to the editor. We need to send our new settings also in that AJAX request. The HTML we will get will be done in the next tutorial.
The function that is doing this is defined as wp.media.editor.send.attachment. This can be found at wp-includes/js/media-editor.js. Let’s add that function in our second script and add our settings to the images:
We are adding our embed option to the variable options. This variable will then be set as the parameter attachment when sending a request.
Let’s look at the AJAX request when our setting is not added (before adding this code):
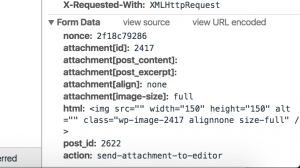
If we now enable our new setting as we did in our code, we will have a slightly different request. Do note that the setting gets inserted only when there is a change on the setting. This means that the setting will be send only when the checkbox has been checked. Let’s check our new setting and try to insert the attachment into a post:

Controlling the Template fields by sending data
We could also control if that image is going to be added or not inside the template. First, we need to hook into a filter that is preparing the attachments for JavaScript:
Here is a rather simple scenario. We will the data to check if the attachment has that field or not. This can be anything, but for the purpose of this tutorial I have chosen the most simpler scenario.
If the attachments need to add this field, we will have it set to true, otherwise will be false. The returned variable $post will then add that data to the variable data in out template.
Each new data that we set through $post is available at data.attachment.attributes. Our own option will be then available at data.attachment.attributes.loggedin. Let’s now edit our template to reflect this change:
Now, we are checking if our attachment is an image and if it should show this field or not.
Conclusion
Editing JavaScript templates needs some more work to enable it. I am trying to find a better way of doing it, but for now, I don’t have a better one. Maybe, there could be some hooks enabled within WordPress and JavaScript to have that, but as for now we need to get our hands dirtier.
Learning Backbone.js could help you understand much more of the JavaScript written for WordPress and it takes time to connect the dots in that code. But, it can be a valuable experience.
Tutorials from this series:
- Introduction
- Custom Field
- Embed Options
- Editor
- Custom Tab
Have you tried to do something similar? Changing or extending something else in JavaScript? Share your experience with us in the comments below!
Become a Sponsor
Nice job diving into the Media Upload template. I recently looked at adding a new option to the “Embed or Link” dropdown and gave up when I saw the Backbone.js code. I chose a different route – I just extended the ‘audio’ shortcode.
Thank you, Damien! I have read your solution for the audio shortcode. That is also an approach I will be tackling on the next tutorial where I’ll show how to display the image with that “logged in” option.
The Backbone.js code can be a little “scary” but since I had to think of something for a project I have been working on, I had nothing else to do then to go and read a bunch of .js files 😉 Jetpack’s videopress module showed me where to start looking.
I look forward to reading the next tutorials.
Reading source code can be fun – and very educational. I love finding new filters and actions that I can use. I am about to experiment with one that Sridhar Katakam wrote about yesterday (nav_menu_link_attributes).
I am glad you like these tutorials 🙂
The wp-includes & wp-admin are the main sources of my searches. Sometimes I also google, but most of the time I am not leaving my editor. In some scenarios, it takes longer, but you get much knowledge for later projects & situations 🙂
That one is also a known filter to me 😀 Used it in many scenarios, even for adding modal click events to links in navigation items.
If you are interested in working with WordPress Menu Walkers for creating your own menu structures, I have written an article about that: https://www.ibenic.com/how-to-create-wordpress-custom-menu-walker-nav-menu-class/
Best of luck with experimenting and learning. If you have any questions or even tutorial ideas, you can always contact me through this website:)
Dear Igor, your tutorial is great. I wanted to add SVG support for the media grid layout, with the template-override i managed it finally, for “tmpl-attachment” and “tmpl-attachment-details-two-column” also.
However, extending wp.media.view.Settings.AttachmentDisplay doesn’t worked for me. The new template code was written in the footer but also the old template code (id) is there, so nothing happens. I guess I have to use another object for “tmpl-attachment”?
I then renamed the (old) script id from “tmpl-attachment” into “tmpl-attachment-old” and created the new “tmpl-attachment” section (with the old id), this worked.
It doesn’t work because the first template is the classic one, I guess. Maybe you can check if there is a way to remove the old template entirely from the admin_footer. I haven’t gone so far so I can’t really tell if there is a way to remove it (or can’t remember currently).
Hm, best would be a method like “remove()”, but no such method is documented as far as i know.
I will take a closer look on the concepts of backbone.js (http://backbonejs.org/), think this could help.
Since you can rewrite the id of a template you should be able to alter the content also completely, so I guess instead removing the old template overwriting the innerHTML of the template is the best solution.